

We've noticed that a lot of our site owners that are starting off creating their websites upload their logos. This makes your cyn.in site look exceptionally cool, especially on the Intranet and email notifications.
What we're going to show you today though, is:
How to make a cool looking banner for your cyn.in site
At cyn.in we constantly endeavor to make the user interface easily usable. Our appearance customization system while quite simplistic to use, is quite featureful.
There are customization areas in the top banner, the left sidebar and the footer areas of the Web Space of every cyn.in site. Each area has the full power of a cyn.in note, you can put in any kind of files, pictures, complex HTML markup with tables, css and whatever formatting you need.
For now, let's show you the simple table design of the cyn.in blog's banner and the nice effect it achieves with a tiled image.
To manage the appearance of your cyn.in site, click on the Manage Site link and then on the Appearance tab. Be patient, this page has a lot of rich editing controls, so it may take a while to load.
Let's take a look:
You can easily customize the displayed areas for your cyn.in site.
The logo appears on your Intranet and on all the RSS feeds that your site can generate.
The banner, sidebar and footer areas can be edited to show up on top, left and bottom areas of your cyn.in site.
The banner area's a great place to show off your creative skills, and sets the feel for the rest of the site.
The sidebar's good for displaying information about you, your site and showing off anything that's applicable site-wide for your web visitors.
All of this is optional of course. For example, we'd rather leave the footer area of the cyn.in blog blank for now, so on the Web Space of blog.cyn.in, you'll notice that nothing appears at the bottom area.
The Banner Area
For now, let's concentrate on the banner area. Let's zoom in a bit:
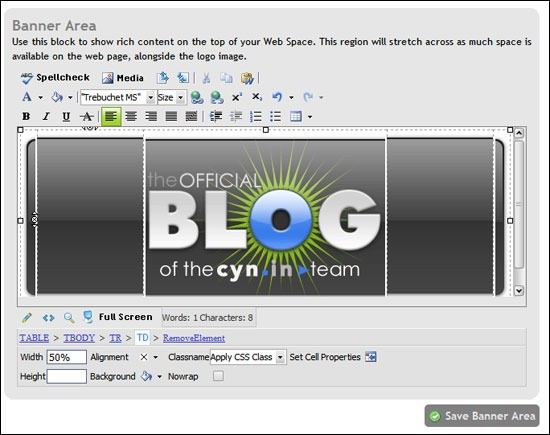
The blog.cyn.in banner is composed using a standard 5 column HTML table. Don't be perturbed by the way it looks in the rich editor, tables tend to get a bit offset in it, due to extra borders, and the editing controls, the preview button should show you exactly how it will look. The exact HTML source is :
<table style="width: 100%;" border="0" cellspacing="0" cellpadding="0">
<tbody>
<tr>
<td><img alt="" src="/sites/default/files/images/blog/2008/07/blog-left.gif" /></td>
<td style="width: 50%;"></td>
<td><a href="http://blog.cyn.in">
<img alt="" src="/sites/default/files/images/blog/2008/07/blog-center.gif" border="0" />
</a></td>
<td style="width: 50%;"></td>
<td><img alt="" src="/sites/default/files/images/blog/2008/07/blog-right.gif" /></td>
</tr>
</tbody>
</table>
This can be easily generated using the table wizard of the cyn.in rich editor. Alternatively, if you're more comfortable with HTML source, you can create the base HTML in your favorite rich HTML editor and paste the code into the source code editor as well. Images for the banner are uploaded by clicking the “Media” button.
The banner table has 5 columns. The first and the last column are for the curve images to the left and right. The 2nd and 4th columns are tiled to fill up to 50% width each - the background image in these columns is the same and the web browser will stretch this area fluidly, filling it by tiling the background image. The 3rd column in the center contains the center image of the banner and also a link on it so that people can click on it to go to the home page.
That's it, that should get you on your way to creating your own banner for your cyn.in site. Don't have one yet? Get one now, it's free!
Tips:
If you put a link on an image, remember to set the image to have border width of 0 pixels, else you'll see ugly blue borders on it.
Remember to center your banner, even if the banner appears on the center for your screen, some people with high resolution or widescreen monitors could visit your site too!
Your banner can only look as good as the images in it, design your images using a good photo as a base with your favorite image editing tool.
This example is pretty advanced, any image uploaded into the banner area should make your site look quite cool - don't be afraid to experiment!
Post a comment here with the URL of your site and everyone can have a look at it and give you suggestions. 🙂